Thursday, September 30, 2010

Environments | page no.5


Page no.5 from the 'environments' sketchbook.

Listening to: Midlake.

Wednesday, September 29, 2010

Backgrounds no.4


Page no.4 from the 'environments' sketchbook.

I'm aware that these 'backgrounds' don't make any sense.
So let me explain just a little about what I think it is,...

For me this is an excercise. So you WILL see failure and ugliness (a lot, I promise you), and hopefully also some successes... The backgrounds... (or maybe environments is a better word for them, because the images don't have a purpose) The environments are painted from reference. Just a personal excercise which I'm throwing 'out there' for you all to see. And also for myself it creates a nice overview of what I'm doing.

So here's what I do: I pick a reference photograph because I like the color and atmosphere, and I try to paint that. Not copy it, but translate it into shapes and color. That's all I do for now. I hope that after doing this for a few weeks I can give myself a more clear excercise. Working more focused on my shortcomings. So far, I have almost none experience in backgrounds/environments/landscapes. I have seen plenty great examples of great backgrounds(design) in books, films, anime cartoons, the real world, but I never draw or paint them myself. It's mostly characters so far... So all I do now is gaining experience by focussing on it and working with it.
Besides this, it is also an excercise with a different material I'm not used to working with.
I'll probably have some conclusions about this too in a few weeks, so bare with me...


Listening to: Motropsycho.

Tuesday, September 28, 2010

Backgrounds no.3


Page no.3.

Listening to: Kings of Convenience.

Monday, September 27, 2010

Backgrounds no.2


No.2
No comment.

Listening to: Christine Fellows; Toe.

Sunday, September 26, 2010

Backgrounds

I started another study project about a week ago.

The subject of study is backgrounds.
With backgrounds I mean african sunsets, icy landscapes, a city street, a bridge in a park, a city build on a rock, a foggy forest, a lava stream, a large tree in a field of grass etc...

I almost have never drawn or painted backgrounds. So my visual knowledge of backgrounds, I feel, is kind of limited. That's why I decided to start this excercise with painting from reference. To build up my visual memory of backgrounds.

Goal is to start by filling a sketchbook with backgrounds. My focus for now is on color. It is not my intention of reproducing the reference photo, but to capture the mood and feel of the image in color and shapes.
So it's not an excercise in learning to paint materials, like rocks, clouds, trees and grass but it's more about what colours make up the atmosphere of the background. That's also why I choose to do it with 'real' paint instead of digital. Now I have to identify the color, mix it, and apply it. This way I have to really think about the color, instead of choosing the right color between all the colors available in photoshop, and if it's not okay then I take another one. Photoshop makes me kind of lazy in a way. The color picker tool now is my eyes and judgement..

I'm doing one each day, after dinner, and I will post all of them on this blog.
Starting with page one.


Listening to: Glorytellers; Secret Stars.

Emily (7)


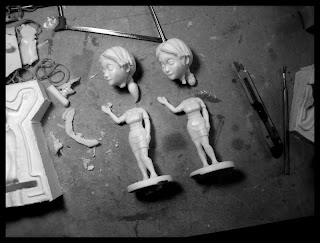
I did the first castings this weekend with the molds I made of the sculpt.
Result.
Not as great as I hoped it would be.
I did three castings.
The first one resulted in a cast which showed a lot of things that went wrong with the recording of the sculpt in silicone. I apparently forgot to take out some clay that was hidden beneath the legs. The result is a really wobbly legs. Also the face mold didn't turn out to be so great. Material leaked out well, everywhere almost. The face looked nice, but the rest did not. The hairs were missing all together, and there were air bubbles showing in the rest of her hair.

The second cast I messed up the proportion of the polyurethane casting material. It didn't set, and as a reault I had to clean up the sticky molds before I could continue with another cast.

The third cast the plastic set well, but... same casting results as the first. A horrible combination of leakage, air pockets and the mold not lining up nice.

So what to do. Here's my plan:

First I'm going to repair the original sculpt. It's showing some cracks, but those will be fixable with some work. And probably do a new mold from the body.

Secondly, after talking it over with some friends of mine, I think I'm going to remodel the head. Meaning, I'm going to sculpt the face and hair separately. This way I can make two easier molds of the hair and the face, and attach them together after casting. I have to think this over a bit, but I think I wil go for it. I'll keep you posted.

So that's the plan for now. Back to the drawing table for me and starting by fixing the original sculpt.
I would like to do a serie of 10 castings, so ... they should come out almost perfect. I'm not plannign to clean up, resculpt and repair 20 casted parts.
It shows again that mold making is a craft in its own.

Wednesday, September 22, 2010

Emily (6)


This is the boxmold for the head.
So now I'm ready to do a cast. I'm gonna save that for the weekend.

No hurry's.

Listening to: Elbow.

Tuesday, September 21, 2010

Emily (5)


The box mold for the body.
The mold for the head will be ready tomorow.
Then I can start making a cast. Very curious what will come out...

Listening to: Akhenaton.

Monday, September 20, 2010

Emily (4)


It's looking good so far ... I think.

The head mold is a little tricky because it consists of three parts.
I chose to do it that way, because then the parting lines will run over the border of the hair, instead of through the middle of her face.
This way the clean up work after casting, becomes a little easier.( I hope.)
There probably is an easier way or technique to make that mold, but I'm not aware of it ... yet, and I never made one before, so it's a nice experiment.
Hopefully it will come out right. I believe it will work.

Fingers crossed, ... a little bit.

Listening to: Josh Rouse (again :-)

Sunday, September 19, 2010

Emily (3)


1st half of the mold making in progress.

Listening to: Joe Hisaishi

Monday, September 13, 2010

Emily (2)


Boiled Emily this weekend. That went pretty smooth.
Now it's a matter of primer and sanding, primer and sanding, primer and sanding ... trying to get rid of the tiny bumps and scratches before making the silicone mold. I also knocked of a hair, so I will have to fix that too.
So I'll probabaly be sanding the whole week, and maybe I can start making the mold this weekend... we'll see.

Listening to: Josh Rouse.

Sunday, September 12, 2010

de Berenkuil, Eindhoven.


A little painting I did at the 'Step in the Arena' International Graffiti Festival this weekend, location 'de Berenkuil' in Eindhoven.
It has been a long time I hold a spraycan in my hands. The weather was beautiful, and the fumes reminded me of old times...

Sunday, September 5, 2010

Emily


Did some more work on the Emily sculpt this weekend.

Started the clean up process and also I'm still making minor adjustments in curves, thickness of parts and shapes every now and than.
I keep noticing little things that just ain't looking like I want them too look like. It's all millimeters, but they make a huge difference in her look.
Overall I think she's still progressing.

I keep saying to myself: Make it work! Hang in there, keep pushing it, don't get comfortable, push it. Work re-work, and re-work, and re-work until you're happy with the result.

So this could take a while ... but I'm loving every second.

Listening to: Ryan Adams, Gil Scott-Heron/Brian Jackson.

Wednesday, September 1, 2010

E is for ...

Emily!


In progress ...

Listening to: Joe Jackson, Masters of Reality.